AT5888UV III: The Ultimate Guide to Features, Setup, and Menu Display
Exploring the AT5888UV III: A Comprehensive Overview of Its Name, Menu Display, and Setup
The AT5888UV III is a standout model in the realm of dual-band handheld radios, renowned for its robust features and user-friendly interface. This article delves into the intricacies of the AT5888UV III, focusing on its name significance, menu display capabilities, and setup process. Whether you’re a seasoned amateur radio operator or a newcomer to the hobby, this guide provides essential insights to help you maximize the use of your AT5888UV III.
Introduction to the AT5888UV III
The AT5888UV III is a powerful dual-band transceiver designed for amateur radio enthusiasts. It offers exceptional performance in both VHF and UHF bands, making it a versatile choice for various communication needs. Its sleek design and advanced features cater to both beginner and experienced users, providing a reliable tool for effective communication.
AT5888UV III Name Significance
The name “AT5888UV III” reflects the model’s specifications and features. The “AT” prefix denotes the manufacturer, while “5888UV” indicates its dual-band capabilities. The “III” suffix signifies that this model is part of the third generation of the AT5888 series, incorporating enhancements and improvements over previous versions. Understanding the name helps users appreciate the evolution of this model and its place in the market.
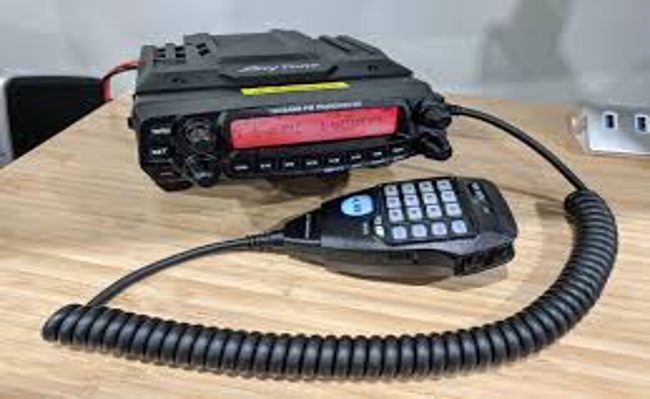
AT5888UV III Menu Display: A Closer Look
The menu display of the AT5888UV III is a critical component that enhances user experience. This model features a clear and intuitive LCD screen, which provides easy access to various settings and functions. The display shows essential information such as frequency, signal strength, and battery status, allowing users to make adjustments quickly and efficiently.
The menu interface is designed to be user-friendly, with logically organized options and settings. Users can navigate through different menus using the control buttons located on the device. The display’s backlight feature ensures visibility in low-light conditions, making it convenient for use in various environments.
AT5888UV III Setup: Step-by-Step Guide
Setting up the AT5888UV III is straightforward, thanks to its well-organized menu system and comprehensive user manual. Follow these steps to get your device up and running:
Unboxing and Initial Inspection
Upon unboxing the AT5888UV III, check all included components to ensure nothing is missing or damaged. The package typically includes the radio unit, an antenna, a battery pack, a charger, and a user manual. Inspect each item for any signs of damage and verify that all components are present.
Installing the Battery
Before powering up the device, insert the battery pack into the radio unit. Align the battery with the contacts inside the compartment and press it firmly into place. Ensure that the battery is securely attached to avoid any operational issues.
Attaching the Antenna
Connect the provided antenna to the antenna port on the top of the radio. Screw it in gently until it is firmly attached. The antenna is crucial for effective signal transmission and reception, so make sure it is properly connected.
Powering On the Radio
Turn on the AT5888UV III by pressing the power button. The device will initiate a startup sequence, and the LCD screen will illuminate. Observe the display to ensure that the device is functioning correctly and that all indicators are operational.
Configuring Basic Settings
Once the radio is powered on, access the menu by pressing the appropriate button. Navigate to the settings menu and configure basic parameters such as frequency range, transmission power, and squelch level. The user manual provides detailed instructions on adjusting these settings to suit your preferences.
Programming Channels
To program channels, access the channel menu and enter the desired frequency and associated settings. Save each channel to the memory, ensuring that you have quick access to frequently used frequencies. The AT5888UV III allows users to store multiple channels, making it versatile for various communication needs.
Testing and Calibration
After programming the channels, perform a test to ensure that the radio is transmitting and receiving signals correctly. Check the signal strength and audio quality to verify that the setup is complete and that the device is operating as expected.
Final Adjustments
Make any final adjustments to settings based on your usage needs. Customize the display, adjust volume levels, and configure additional features as necessary. Refer to the user manual for guidance on advanced settings and functions.
Advanced Features and Customization
The AT5888UV III offers several advanced features that enhance its functionality. These include programmable memory channels, dual-watch capability, and customizable display options. Users can explore these features to tailor the device to their specific needs, ensuring optimal performance for various communication scenarios.
Dual-Band Operation
One of the key advantages of the AT5888UV III is its dual-band operation, which allows users to transmit and receive on both VHF and UHF bands. This versatility makes it suitable for a wide range of applications, from local communication to long-distance transmissions.
Programmable Memory Channels
The device supports programmable memory channels, enabling users to store frequently used frequencies for quick access. This feature is particularly useful for monitoring multiple channels simultaneously or for maintaining communication with specific groups.
Customizable Display Settings
Users can customize the LCD display to suit their preferences. Options include adjusting the backlight intensity, choosing display colors, and configuring the layout of information on the screen. These customization options enhance the user experience and ensure that the display meets individual needs.
Troubleshooting Common Issues
Despite its reliability, users may encounter some common issues with the AT5888UV III. Here are a few troubleshooting tips:
- No Signal Reception: Ensure that the antenna is properly connected and that the frequency settings are correct. Check for any obstructions or interference that may be affecting signal reception.
- Poor Audio Quality: Adjust the volume and squelch settings to improve audio clarity. Verify that the microphone and speaker are functioning correctly.
- Battery Life Concerns: If the battery life is shorter than expected, consider recalibrating the battery or replacing it with a new one. Ensure that the battery is fully charged before use.
Conclusion
The AT5888UV III is a highly capable dual-band handheld radio that offers a range of features for amateur radio enthusiasts. Its intuitive menu display, straightforward setup process, and advanced capabilities make it a valuable tool for effective communication. By understanding its name significance, mastering the menu display, and following the setup guide, users can maximize their experience with this versatile device. Whether you’re a hobbyist or a professional, the AT5888UV III provides the functionality and reliability needed for successful communication.